So far, you have examined how to create, hydrate, and iterate over the contents of a DataSet object manually using the inherit object model of ADO.NET. While understanding how to do so is quite important, the .NET platform ships with numerous APIs that have the ability to bind data to user interface elements automatically.
For example, the original GUI toolkit of .NET, Windows Forms, supplies a control named DataGridView that includes the built-in ability to display the contents of a DataSet or DataTable object using only a few lines of code. ASP.NET (.NET’s web development API) and the Windows Presentation Foundation API (a supercharged GUI API introduced with .NET 3.0) also support the notion of data binding. You will learn to bind data to WPF and ASP.NET GUI elements later in this book; however, in this chapter, you will use Windows Forms because it is a fairly simple and straightforward programming model.
Note The next example assumes you have some experience using Windows Forms to build graphical user interfaces. If this is not the case, you might wish to open the solution and follow along or return to this section once you have read Appendix A.
Your next task is to build a Windows Forms application that will display the contents of a DataTable object within its user interface. Along the way, you will also examine how to filter and change table data. You will also learn about the role of the DataView object.
Begin by creating a brand-new Windows Forms project workspace named WindowsFormsDataBinding. Rename your initial Form1.cs file to the more fitting MainForm.cs using the Solution Explorer. Next, use the Visual Studio 2010 Toolbox to drag a DataGridView control (renamed to carInventoryGridView using the (Name) property of the Properties window) onto the designer surface. Notice that when you do this, you activate a context menu that allows you to connect to a physical data source. For the time being, ignore this aspect of the designer because you will be binding your DataTable object programmatically. Finally, add a descriptive Label to your designer for information purposes. Figure 22-5 shows one possible look-and-feel.

Figure 22-5 The initial GUI of your Windows Forms application
Similar to the previous SimpleDataSet example, the WindowsFormsDataBinding application will construct a DataTable that contains a set of DataColumns representing various columns and rows of data. This time, however, you will fill the rows using a generic List<T> member variable. First, insert a new C# class into your project (named Car), which you define as follows:
public class Car
{
    public int ID { get; set; }
    public string PetName { get; set; }
    public string Make { get; set; }
    public string Color { get; set; }
}
Within the default constructor of your main form, populate a List<T> member variable (named listCars) with a set of new Car objects:
public partial class MainForm : Form
{
    // A collection of Car objects.
    List<Car> listCars = null;

    public MainForm()
    {
        InitializeComponent();

        // Fill the list with some cars.
        listCars = new List<Car>
        {
            new Car { ID = 100, PetName = "Chucky", Make = "BMW", Color = "Green" },
            new Car { ID = 101, PetName = "Tiny", Make = "Yugo", Color = "White" },
            new Car { ID = 102, PetName = "Ami", Make = "Jeep", Color = "Tan" },
            new Car { ID = 103, PetName = "Pain Inducer", Make = "Caravan",
                Color = "Pink" },
            new Car { ID = 104, PetName = "Fred", Make = "BMW", Color = "Green" },
            new Car { ID = 105, PetName = "Sidd", Make = "BMW", Color = "Black" },
            new Car { ID = 106, PetName = "Mel", Make = "Firebird", Color = "Red" },
            new Car { ID = 107, PetName = "Sarah", Make = "Colt", Color = "Black" },
        };
    }
}
Next, add a new member variable named inventoryTable of type DataTable to your MainForm class type:
public partial class MainForm : Form
{
    // A collection of Car objects.
    List<Car> listCars = null;

    // Inventory information
    DataTable inventoryTable = new DataTable();
...
}
Now add a new helper function to your class named CreateDataTable() and call this method within the default constructor of the MainForm class:
private void CreateDataTable()
{
        // Create table schema.
    DataColumn carIDColumn = new DataColumn("ID", typeof(int));
    DataColumn carMakeColumn = new DataColumn("Make", typeof(string));
    DataColumn carColorColumn = new DataColumn("Color", typeof(string));
    DataColumn carPetNameColumn = new DataColumn("PetName", typeof(string));
    carPetNameColumn.Caption = "Pet Name";
    inventoryTable.Columns.AddRange(new DataColumn[] { carIDColumn,
        carMakeColumn, carColorColumn, carPetNameColumn });

    // Iterate over the List<T> to make rows.
    foreach (Car c in listCars)
    {
        DataRow newRow = inventoryTable.NewRow();
        newRow["ID"] = c.ID;
        newRow["Make"] = c.Make;
        newRow["Color"] = c.Color;
        newRow["PetName"] = c.PetName;
        inventoryTable.Rows.Add(newRow);
    }

    // Bind the DataTable to the carInventoryGridView.
    carInventoryGridView.DataSource = inventoryTable;
}
The method implementation begins by creating the schema of the DataTable by creating four DataColumn objects (for the sake of simplicity, you don’t need to bother autoincrementing the ID field or set it as a primary key). After you do this, you can add them to the column collection of the DataTable member variable. You map the row data from your List<Car> collection into the DataTable using a foreach iteration construct and the native ADO.NET object model.
However, notice that the final code statement within the CreateDataTable() method assigns the inventoryTable to the DataSource property of the DataGridView object. This single property is all you need to set to bind a DataTable to a Windows Forms DataGridView object. Under the hood, this GUI control reads the row and column collections internally, much like what happens with the PrintDataSet() method of the SimpleDataSet example. At this point, you should be able to run your application and see the DataTable within the DataGridView control, as shown in Figure 22-6.
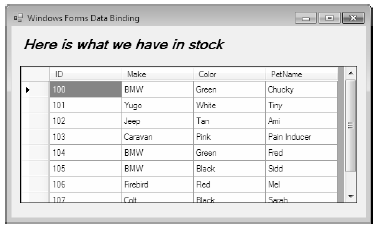
Figure 22-6 Binding a DataTable to a Windows Forms DataGridView
Now, assume you wish to update your graphical interface to allow the user to delete a row from the inmemory DataTable that is bound to the DataGridView. One approach is to call the Delete() method of the DataRow object that represents the row to terminate. In this case, you specify the index (or DataRow object) representing the row to remove. To allow the user to specify which row to delete, add a TextBox (named txtCarToRemove) and a Button control (named btnRemoveCar) to the current designer. Figure 22-7 shows one possible UI update (note this example wraps the two controls in a GroupBox control, illustrating how they are related).
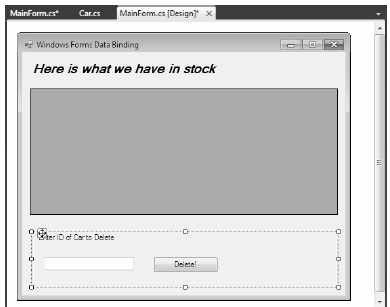
Figure 22-7 Updating the UI to enable removal of rows from the underlying DataTable
The following logic behind the new Button’s Click event handler removes the user-specified row, based on the ID of a car, from your in-memory DataTable. The Select() method of the DataTable class allows you to specify a search criteria, which is modeled after normal SQL syntax. The return value is an array of DataRow objects that matches the search criteria:
// Remove this row from the DataRowCollection.
private void btnRemoveCar_Click (object sender, EventArgs e)
{
    try
    {
        // Find the correct row to delete.
        DataRow[] rowToDelete = inventoryTable.Select(
            string.Format("ID={0}", int.Parse(txtCarToRemove.Text)));

        // Delete it!
        rowToDelete[0].Delete();
        inventoryTable.AcceptChanges();
    }
    catch (Exception ex)
    {
        MessageBox.Show(ex.Message);
    }
}
You should now be able to run your application and specify a car ID to delete from the DataTable. As you remove DataRow objects from the DataTable, you will notice that the grid’s UI is updated immediately; this occurs because it is bound to the state of the DataTable object.
Many data-centric applications require the need to view a small subset of a DataTable’s data, as specified by some sort of filtering criteria. For example, assume you wish to see only a certain make of automobile from the in-memory DataTable (e.g., only BMWs). You’ve already seen how the Select() method of the DataTable class allows you to find a row to delete; however you can also use this method to grab a subset of records for display purposes.
To see this in action, update your UI again, this time allowing users to specify a string that represents the make of the automobile they want to see (see Figure 22-8) using a new TextBox (named txtMakeToView) and a new Button (named btnDisplayMakes).

Figure 22-8 Updating the UI to enable row filtering
The Select() method has been overloaded a number of times to provide different selection semantics. At its most basic level, the parameter sent to Select() is a string that contains some conditional operation. To begin, observe the following logic for the Click event handler of your new button:The Select() method has been overloaded a number of times to provide different selection semantics. At its most basic level, the parameter sent to Select() is a string that contains some conditional operation. To begin, observe the following logic for the Click event handler of your new button:
private void btnDisplayMakes_Click(object sender, EventArgs e)
{
    // Build a filter based on user input.
    string filterStr = string.Format("Make= '{0}'", txtMakeToView.Text);

    // Find all rows matching the filter.
    DataRow[] makes = inventoryTable.Select(filterStr);

    if (makes.Length == 0)
        MessageBox.Show("Sorry, no cars...", "Selection error!");
    else
    {
        string strMake = "";
        for (int i = 0; i < makes.Length; i++)
        {
            // From the current row, get the PetName value.
            strMake += makes[i]["PetName"] + "\n";
        }

        // Show the names of call cars matching the specified Make.
        MessageBox.Show(strMake,
        string.Format("We have {0}s named:", txtMakeToView.Text));
    }
}
Here, you begin by building a simple filter based on the value in the associated TextBox. If you specify BMW, your filter looks like this:
Make = 'BMW'
When you send this filter to the Select() method, you get back an array of DataRow types that represent each row that matches the filter (see Figure 22-9).
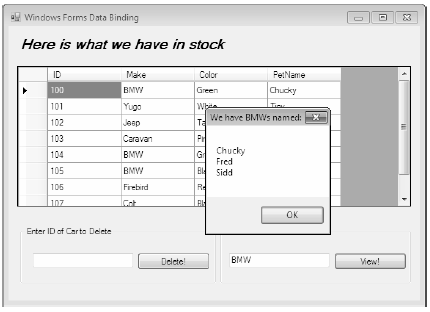
Figure 22-9 Displaying filtered data
Again, the filtering logic is based on standard SQL syntax. For example, assume you wish to obtain the results of the previous Select() invocation alphabetically, based on the pet name. In terms of SQL, this translates into a sort based on the PetName column. Fortunately, the Select() method has been overloaded to send in a sort criterion:
// Sort by PetName.
makes = inventoryTable.Select(filterStr, "PetName");
Call Select() as seen here if you want the results in descending order:
// Return results in descending order.
makes = inventoryTable.Select(filterStr, "PetName DESC");
In general, the sort string contains the column name, followed by ASC (ascending, which is the default) or DESC (descending). If necessary, you can separate multiple columns by commas. Finally, understand that a filter string can be composed of any number of relational operators. For example, assume you want to find all cars with an ID greater than 5. This helper function lets you accomplish that:
private void ShowCarsWithIdGreaterThanFive()
{
    // Now show the pet names of all cars with ID greater than 5.
    DataRow[] properIDs;
    string newFilterStr = "ID > 5";
    properIDs = inventoryTable.Select(newFilterStr);
    string strIDs = null;
    for(int i = 0; i < properIDs.Length; i++)
    {
        DataRow temp = properIDs[i];
        strIDs += temp["PetName"]
            + " is ID " + temp["ID"] + "\n";
    }
    MessageBox.Show(strIDs, "Pet names of cars where ID > 5");
}
The final aspect of the DataTable you should be aware of is the process of updating an existing row with new values. One approach is to first obtain the row(s) that match a given filter criterion using the Select() method. Once you obtain the DataRow(s) in question, modify them accordingly. For example, assume you have a new Button on your form named btnChangeMakes that (when clicked) searches the DataTable for all rows where Make is equal to BMW. Once you identify these items, you change the Make from BMW to Yugo:
// Find the rows you want to edit with a filter.
private void btnChangeMakes_Click(object sender, EventArgs e)
{
    // Confirm selection.
    if (DialogResult.Yes ==
        MessageBox.Show("Are you sure?? BMWs are much nicer than Yugos!",
            "Please Confirm!", MessageBoxButtons.YesNo))
    {
        // Build a filter.
        string filterStr = "Make='BMW'";
        string strMake = string.Empty;

        // Find all rows matching the filter.
        DataRow[] makes = inventoryTable.Select(filterStr);

        // Change all Beemers to Yugos!
        for (int i = 0; i < makes.Length; i++)
        {
            makes[i]["Make"] = "Yugo";
    }
}
}
A view object is an alternative representation of a table (or set of tables). For example, you can use Microsoft SQL Server to create a view for your Inventory table that returns a new table containing automobiles only of a given color. In ADO.NET, the DataView type allows you to extract a subset of data programmatically from the DataTable into a stand-alone object.
One great advantage of holding multiple views of the same table is that you can bind these views to various GUI widgets (such as the DataGridView). For example, one DataGridView might be bound to a DataView showing all autos in the Inventory, while another might be configured to display only green automobiles.
To see this in action, update the current UI with an additional DataGridView type named dataGridYugosView and a descriptive Label. Next, define a member variable named yugosOnlyView of type DataView:
public partial class MainForm : Form
{
    // View of the DataTable.
    DataView yugosOnlyView;
...
}
Now create a new helper function named CreateDataView() and call this method within the form’s default constructor immediately after the DataTable has been fully constructed, as shown here:
public MainForm()
{
...
    // Make a data table.
    CreateDataTable();

    // Make a view.
    CreateDataView();
}
Here is the implementation of this new helper function. Notice that the constructor of each DataView has been passed the DataTable that you will use to build the custom set of data rows:
private void CreateDataView()
{
    // Set the table that is used to construct this view.
    yugosOnlyView = new DataView(inventoryTable);

    // Now configure the views using a filter.
    yugosOnlyView.RowFilter = "Make = 'Yugo'";

    // Bind to the new grid.
    dataGridYugosView.DataSource = yugosOnlyView;
}
As you can see, the DataView class supports a property named RowFilter, which contains the string representing the filtering criteria used to extract matching rows. Once you establish your view, set the grid’s DataSource property accordingly. Figure 22-10 shows the completed Windows Forms data-binding application in action.
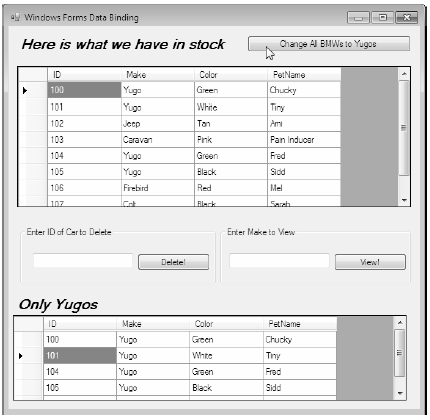
Figure 22-10 Displaying a unique view of your data
Source Code You can find the WindowsFormsDataBinding project under the Chapter 22 subdirectory.